This part will definitely be the longest so far. First we have to get familiar with the basic building blocks of 3D math, namely vectors, quaternions and matrices. Then we have to use them to draw a cube on the screen and rotate it in real time. Finally we also texture the cube just so that we can verify everything worked out as we would expect.
The name of this tutorial suggests that we will do everything from scratch, but it also suggests that
its about OpenGL. We do need a math library however and the compromise I came up with is that I will give
you a very lightweight and easy to understand math library that I wrote just for this tutorial.
The flip side is that we will not go over the contents of that math library. Just go and look into it if you need to.
If you don't want to write your own you can use GLM libary for example.
As I mentioned we will be using Vectors, Quaternions and Matrices. Vectors will mostly represent positions and directions.
Quaternions will represent rotations. Matrices will be used to transform directions and positions between different coordinate
spaces. I will try to give a more thorough explanation once we actually face them.
Here's the math library: TutMath.h
Here's the starting code for this part: tut04start.cpp
Our goal is to draw a cube so let's start by setting up the data and buffers to draw it from.
First add a new struct declaration that will contain the buffer handles.
struct GLMesh
{
	GLuint vao; // vertex array object
	GLuint vbo; // vertex buffer object
	GLuint ebo; // element array buffer object
	int indexCount; // number of indices
};
Let's separate creating the cube mesh into a fuction.
void CreateCubeMesh(GLMesh* glmesh)
{
	// we will initialize the cube here
}
Now let's initialize the data.
struct LocalVertex
{
	Vec3 pos;
	Vec2 tex;
};

LocalVertex vertices[] = {
	{ { -0.5f,-0.5f,  0.5f },{ 0.0f, 0.0f } },
	{ { 0.5f, -0.5f,  0.5f },{ 1.0f, 0.0f } },
	{ { 0.5f,  0.5f,  0.5f },{ 1.0f, 1.0f } },
	{ {-0.5f,  0.5f,  0.5f },{ 0.0f, 1.0f } },
	{ { 0.5f, -0.5f,  0.5f },{ 0.0f, 0.0f } },
	{ { 0.5f, -0.5f, -0.5f },{ 1.0f, 0.0f } },
	{ { 0.5f,  0.5f, -0.5f },{ 1.0f, 1.0f } },
	{ { 0.5f,  0.5f,  0.5f },{ 0.0f, 1.0f } },
	{ { 0.5f, -0.5f, -0.5f },{ 0.0f, 0.0f } },
	{ {-0.5f, -0.5f, -0.5f },{ 1.0f, 0.0f } },
	{ {-0.5f,  0.5f, -0.5f },{ 1.0f, 1.0f } },
	{ { 0.5f,  0.5f, -0.5f },{ 0.0f, 1.0f } },
	{ {-0.5f, -0.5f, -0.5f },{ 0.0f, 0.0f } },
	{ {-0.5f, -0.5f,  0.5f },{ 1.0f, 0.0f } },
	{ {-0.5f,  0.5f,  0.5f },{ 1.0f, 1.0f } },
	{ {-0.5f,  0.5f, -0.5f },{ 0.0f, 1.0f } },
	{ {-0.5f,  0.5f,  0.5f },{ 0.0f, 0.0f } },
	{ { 0.5f,  0.5f,  0.5f },{ 1.0f, 0.0f } },
	{ { 0.5f,  0.5f, -0.5f },{ 1.0f, 1.0f } },
	{ {-0.5f,  0.5f, -0.5f },{ 0.0f, 1.0f } },
	{ {-0.5f, -0.5f, -0.5f },{ 0.0f, 0.0f } },
	{ { 0.5f, -0.5f, -0.5f },{ 1.0f, 0.0f } },
	{ { 0.5f, -0.5f,  0.5f },{ 1.0f, 1.0f } },
	{ {-0.5f, -0.5f,  0.5f },{ 0.0f, 1.0f } }
};

unsigned short indices[]
{
	0, 1, 2, 2, 3, 0,
	4, 5, 6, 6, 7, 4,
	8, 9, 10, 10, 11, 8,
	12, 13, 14, 14, 15, 12,
	16, 17, 18, 18, 19, 16,
	20, 21, 22, 22, 23, 20
};
First we define a vertex structure locally because that will save us from doing the size calculations manually later.
Our vertices will have 2 attributes for now, vertex position and texture UV coordinates.
Next we create the vertex array. Just by looking at the structure we defined earlier you should be able to tell
what the numbers mean. ((x, y, z), (u, v)). You might be confused why there are 24 vertices when a cube only has 8 corners.
We totally could draw an untextured and unlit cube with 8 vertices, but think about a textured cube. The vertices
will have different texture coordinates for each face and the texture coordinates are linked to the vertices so we also need 8 vertices.
Even if you figure out some way to texture it you'll have a problem later when we need surface normals for lighting.
We also initialize the array of indices. As the name suggests they are indices to the vertex array.
In other words they reference the element number of a vertex. 3 indices for a triangle,
2 triangles per face and 6 faces for a cube, total of 36 indices. See how it saves us from having 36 vertices, it is even
better for more complicated 3D models which share much larger portion of the vertices. Another thing to note is that
the triangle winding order in OpenGL is CCW (counter-clockwise) by default. Usually only 1 side of a triangle
is drawn, to draw both sides you would have to draw it twice. The front face is determined by the order in which you draw the vertices.
By default face culling is off in OpenGL so it won't really matter for now. Also the winding order can be changed but you want to be consistent with it.
Now lets pass the data to OpenGL.
glGenVertexArrays(1, &glmesh->vao);
glBindVertexArray(glmesh->vao);

glGenBuffers(1, &glmesh->vbo);
glBindBuffer(GL_ARRAY_BUFFER, glmesh->vbo);
glBufferData(GL_ARRAY_BUFFER, sizeof(vertices), vertices, GL_STATIC_DRAW);
glEnableVertexAttribArray(0);
glEnableVertexAttribArray(1);

glVertexAttribPointer(0, 3, GL_FLOAT, GL_FALSE, sizeof(LocalVertex), 0);
glVertexAttribPointer(1, 2, GL_FLOAT, GL_FALSE, sizeof(LocalVertex), (GLvoid*)offsetof(LocalVertex, tex));

glGenBuffers(1, &glmesh->ebo);
glBindBuffer(GL_ELEMENT_ARRAY_BUFFER, glmesh->ebo);
glBufferData(GL_ELEMENT_ARRAY_BUFFER, sizeof(indices), indices, GL_STATIC_DRAW);

glBindVertexArray(0);

glmesh->indexCount = COUNT_OF(indices);
A lot of this should be familiar from the last tutorial. The 2 new things are Vertex Array Object (VAO) and Element Array Buffer.
VAO basically keeps references to buffers it has been bound to and stores the state associated with those buffers. glBindBuffer binds a buffer to the VAO and all state changes you do
to those buffers will be saved in VAO. This saves you from having to do glEnableVertexAttribArray and glVertexAttribPointer every time
you want to draw from a buffer. With VAO you only have to do it once and when you need to draw you just bind the VAO
and all the associated state is restored. In previous tutorial we also used a VAO behind the scenes. If you don't bind a VAO the default one is used (equivalent to glBindVertexArray(0)).
Element Array Buffer is a buffer for the indices we initialized earlier. Instead of drawing with glDrawArrays we can now draw with glDrawElements.
Lastly we store the number of indices so we know how many indices to draw in the main loop. With that our cube model data is ready.
Now call the function we just created somewhere before the main loop.
GLMesh mesh;
CreateCubeMesh(&mesh);
Let's try to draw what we just created by adding the following code to the main loop.
glBindVertexArray(mesh.vao);
glDrawElements(GL_TRIANGLES, mesh.indexCount, GL_UNSIGNED_SHORT, 0);
glBindVertexArray(0);
If you run the program then you should see a white rectangle. That's because in the vertex shader we take whatever
vertex coordinate is passed to the shader and draw it directly on the screen. Instead we need to transform
the vertices from model space to clip space. Normally there are 2 more transformations on the way.
Model space -> World space -> View space -> Clip space
In model space the vertex coordinates are whatever they were loaded as from a 3D model. In our current case it's the array of vertices we created.
To transform vertices from model space to world space we have to apply translation, rotation and scale to the model vertices. Translation moves the object, rotation rotates and scale scales (duh).
Those three are composed into a model matrix.
To transform from world space to view space we basically apply the camera transformations to the vertices. Somewhat famous statement is that in games
the camera doesn't move, the world moves around the camera. You can kind of think of it like that. For example if our camera is at position (10.0, 10.0, -5.0) we can
instead move all the vertices in the world (-10.0, -10.0, 5.0). Same goes for rotation, we just rotate the entire world in opposite direction of the camera's rotation.
We then compose the translation and rotation into a view matrix. The camera in 3D scene is kind of imaginary.
The last transformation is from view space to clip space. Basically we take all the vertices in the scene and slam them into a 2x2x2 unit cube (OpenGL clip space is -1..1).
This will be done by our projection matrix. There are 2 most commonly used projections. Either perspective projection or orthographic projection.
Perspective projection is the one you want to use in most 3D scenes. With perspective projection objects get smaller the further away they are. In orthographic projection the view frustum is a rectangular box which doesn't look very realistic but it is useful for 3D modeling, shadow maps etc.
All this gives us 3 matrices which we can then multiply together into a single MVP (Model-View-Projection) matrix.
If you now look into the math library you can see that all the tools we just talked about are there. So let's use them.
First thing we should do is modify the vertex shader to include the MVP matrix as an uniform and then we multiply the vertex position by the MVP matrix.
char* vertex_shader_str =
"#version 400 core \n\
layout(location = 0) in vec4 position; \n\
uniform mat4 MVP; \n\
void main() { \n\
	gl_Position = MVP*position; \n\
}";
Next we should create the perspective projection matrix. We can do that outside the main loop because
the projection doesn't change during runtime. Only time it would change in a game is when you adjust the FOV (Field of view), view distance or something else like that.
Also we should get the location of the MVP matrix uniform in our shader.
glUseProgram(defaultProgram);
Mat4 perspectiveM = Mat4::Perspective(70, (float)WINDOW_WIDTH / WINDOW_HEIGHT, 0.1f, 100.0f);
GLuint mvpLoc = glGetUniformLocation(defaultProgram, "MVP");
We create the perspective matrix with 70 degree FOV. Aspect ratio is basically screen width / height unless you have some really weird monitor. Last 2 arguments specify the near and far plane distance, anything closer/further won't be rendered.
We are getting close. Now we just have to specify the model and view matrices, multiply all 3 together and set the uniform. Then we can try drawing the cube. We will do all that in the main loop.
glUseProgram(defaultProgram);
Vec3 cubePos(0.0f, 0.0f, -2.0f);
Vec3 cubeScale(1.0f, 1.0f, 1.0f);
Quaternion cubeRotation = Quaternion::AngleAxis((float)i / 100.0f, Vec3(0.0f, 1.0f, 0.0f));
Mat4 modelM = Mat4::TRS(cubePos, cubeRotation, cubeScale);
Mat4 viewM = Mat4::Identity();
Mat4 MVP = perspectiveM*viewM*modelM;
glUniformMatrix4fv(mvpLoc, 1, GL_FALSE, (GLfloat*)&MVP);

glBindVertexArray(mesh.vao);
glDrawElements(GL_TRIANGLES, mesh.indexCount, GL_UNSIGNED_SHORT, 0);
glBindVertexArray(0);
As you might be able to tell we aren't really using a view matrix. I added it just to show where it should be.
Multiplying by identity matrix does nothing. You can think of it like our camera is at 0,0,0 with no rotation.
Instead we move the cube 2 units in the negative direction on the z (depth) axis. Old OpenGL used right-handed coordinate system, which I also used in the math library.
Basically what that means is that forward direction is in the negative direction on the Z axis. To sum this up we move the cube 2 units forward relative to the 'camera'.
Next we rotate the cube based on the current frame number. You can think of Quaternion.AngleAxis as if you stick a pole through the object and then rotate the pole.
Our pole in this case is (0.0, 1.0, 0.0) meaning straight up, and if we rotate that pole it's the equivalent of 'yaw' rotation or Z euler angle.
Scale is (1, 1, 1) because we don't want any scaling.
Now we create the matrix using TRS(translation, rotation, scale).
Finally we multiply the matrices together. Note that the order of matrix multiplication matters and you should read them from right to left.
Now we set the uniform for shader and then draw the mesh by binding the VAO and calling glDrawElements.
The i in the AngleAxis is just frame number, it's more like an hack to animate the cube, really you would like to use a timer that keeps track of time since start.
Add int i = 0; before the main loop and i++; before the end brace to make it work.
If you run the program you should see a solid white thing that kind of looks like a cube.
The speed of the rotation completely depends on how fast your computer can render it in this case.
We set up the texture coordinates before so it would also be great to texture the cube to actually see a what's going on. There's a
problem with the cube we can't currently see.
First lets modify the fragment shader to paint colors from a texture instead of a solid white.
char* frag_shader_str =
"#version 400 core\n\
in vec2 UV; \n\
uniform sampler2D tex; \n\
layout(location = 0) out vec4 outColor;\n\
void main() {\n\
	vec2 texCoord = vec2(UV.x, 1.0f - UV.y); \n\
	outColor = texture2D(tex, texCoord); \n\
}";
Texture samplers are also uniforms like the MVP matrix in our vertex shader. To sample the texture we use texture2D in shader which takes a sampler and a texture coordinate as parameters.
Note that we flip the y coordinate of the texture coordinate. It's not because our cube data is wrong, it's because OpenGL expects the first pixel of a texture to be in the lower left corner
while pretty much every image/texture loader expects it to be top left corner. The other option would be to change the memory layout of every texture before submitting it to OpenGL or
use an image loader that happens to support OpenGL's format.
Doesn't inverting the y coordinate seem easier?
We also added UV 'in' variable in the fragment shader. We have to set that variable as 'out' in the vertex shader.
char* vertex_shader_str =
"#version 400 core \n\
layout(location = 0) in vec4 position; \n\
layout(location = 1) in vec2 vertUV; \n\
out vec2 UV; \n\
uniform mat4 MVP; \n\
void main() { \n\
	gl_Position = MVP*position; \n\
	UV = vertUV; \n\
}";
We take the vertex attribute from location 1 and pass it to the fragment shader as 'out' variable. Our shaders are now ready for texturing
Now we have to get some kind of texture to OpenGL. We could write our own .bmp image loader, but that would be a waste of time. Writing an image loader for anything better than .bmp would be a lot of work. In this tutorial I will use stb_image.h, but you can use whatever image loader you want. To use stb_image just add the following at the top of your source file.
#define STB_IMAGE_IMPLEMENTATION
#include "stb_image.h"
Now lets load the texture. Find any picture and add it into the working directory of your project (.png works for sure). Now we have to load the texture somewhere before the main loop.
int width, height, components;
unsigned char *imageData = stbi_load("cat.png", &width, &height, &components, 0);
if(imageData == 0)
{
	OutputDebugStringA("Loading texture failed!\n");
	return -1;
}
else if (components != 3 && components != 4)
{
	OutputDebugStringA("Only RGB or RGBA currently supported!\n");
	return -1;
}
GLuint texture;
glGenTextures(1, &texture);
glBindTexture(GL_TEXTURE_2D, texture);
GLuint texFormat = components == 3 ? GL_RGB : GL_RGBA;
glTexImage2D(GL_TEXTURE_2D, 0, texFormat, width, height, 0, texFormat, GL_UNSIGNED_BYTE, imageData);
glTexParameteri(GL_TEXTURE_2D, GL_TEXTURE_MAG_FILTER, GL_LINEAR);
glTexParameteri(GL_TEXTURE_2D, GL_TEXTURE_MIN_FILTER, GL_LINEAR);
glBindTexture(GL_TEXTURE_2D, 0);
stbi_image_free(imageData);
Loading the image to memory with stb_image is only 1 line of code as you can see. If it fails then it returns a null pointer.
To get the image to OpenGL we have to generate a texture and bind it. Then we load it using glTexImage2D. Finally we set the magnification and minification filters. GL_LINEAR means linear filtering,
you can also use GL_NEAREST which looks much worse and isn't worth it anymore unless you need it for some specific purpose.
This is also the place to generate your mipmaps if you want them.
glGenerateMipmap(GL_TEXTURE_2D);
// see also GL_NEAREST_MIPMAP_NEAREST GL_LINEAR_MIPMAP_NEAREST
glTexParameteri(GL_TEXTURE_2D, GL_TEXTURE_MIN_FILTER, GL_LINEAR_MIPMAP_LINEAR);
You can also tell OpenGL to compress your textures, which will save you some VRAM. You'd expect it to perform worse, but it can actually improve it.
GLuint internalFormat = components == 3 ? GL_COMPRESSED_RGB : GL_COMPRESSED_RGBA;
GLuint texFormat = components == 3 ? GL_RGB : GL_RGBA;
glTexImage2D(GL_TEXTURE_2D, 0, internalFormat, width, height, 0, texFormat, GL_UNSIGNED_BYTE, imageData);
One additional note for textures is that you should prefer sizes that are power of 2 ( .., 64, 128, 256 ... ). Non power of 2 texture sizes might cost you performance, wasted VRAM or might not even be supported on some hardware.
It's not so much the case these days though.
Now lets also get the uniform location for the texture
GLuint texLoc = glGetUniformLocation(defaultProgram, "tex");
Now lets go to the main loop and set the texture uniform.
glUniform1i(texLoc, 0);
glActiveTexture(GL_TEXTURE0 + 0);
glBindTexture(GL_TEXTURE_2D, texture);
With glUniform1i we set the texture unit to 0. Texture unit 0 is normally used for the albedo (color) texture.
Next we make texture unit 0 active and then bind our texture to it.
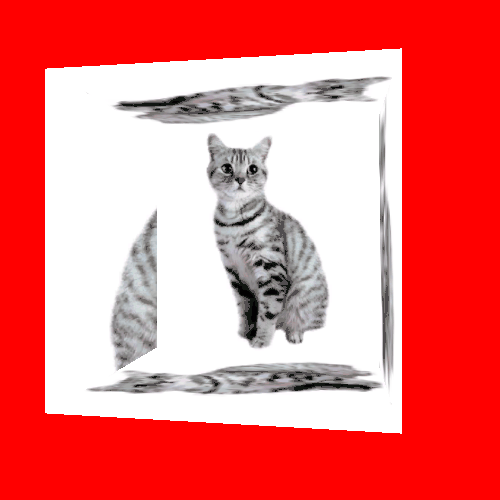
You can now try running the program and you should see this.
This doesn't look right, does it? There's actually 2 things wrong here. Fixing one would mask the other in this case, but we will fix both.
First of all face culling clearly isn't working. This shouldn't come as a surprise considering I mentioned it earlier.
The second problem is that further locations are drawn on top even if something closer was already drawn before it.
The problem is that we haven't enabled depth testing. Z (depth) buffer basically stores the depth of each fragment and you can tell OpenGL
not to draw a fragment if it has higher depth value that's already present. The function that decides how the depth buffer should
be used is programmable to some degree and we will use the standard 'Less than or equal' function.
To enable those features just add the following lines somewhere before the main loop.
glEnable(GL_CULL_FACE); // enable face culling
glDepthFunc(GL_LEQUAL); // set depth function
glEnable(GL_DEPTH_TEST); // enable depth testing
Our cube and kitty should look much better now. (the artifacts in the gif are from encoding)
We should also free all resources we've acquired. It isn't currently a problem in our program because windows will clean everything up for us once the application closes.
However imagine a normal game where you would load and unload resources many times during runtime. If you never free resources, you will eventually run out of memory.
It's good to have the habit of cleaning up even if you're fine without it.
First let's create a function to free the mesh.
void FreeMesh(GLMesh *glmesh)
{
	glDeleteVertexArrays(1, &glmesh->vao);
	glDeleteBuffers(1, &glmesh->vbo);
	glDeleteBuffers(1, &glmesh->ebo);
	glmesh->indexCount = 0;
}
Now let's free the mesh and everything else after the main loop.
FreeMesh(&mesh);
glDeleteProgram(defaultProgram);
glDeleteTextures(1, &texture);
That's it for this tutorial. You should be able to make a simple model loader with what we've learned so far.
Final code